A state machine is a type of automation that uses a finite number of states in its execution. It can go into a state when it is triggered by an activity, and it exits that state when another activity is triggered.
Another important aspect of state machines are transitions, as they also enable you to add conditions based on which to jump from one state to another. These are represented by arrows or branches between states.
There are two activities that are specific to state machines, namely State and Final State, found under Workflow > State Machine.
Note:
You can only create one initial state, yet it is possible to have more than one Final State.
The State activity contains three sections, Entry, Exit and Transition(s), while the Final State only contains one section, Entry. Both of these activities can be expanded by double-clicking them, to view more information and edit them.
The Entry and Exit sections enable you to add entry and exit triggers for the selected state, while the Transition(s) section displays all the transitions linked to the selected state.

Transitions are expanded when you double-click them, just like the State activity. They contain three sections, Trigger, Condition and Action, that enable you to add a trigger for the next state, or add a condition under which an activity or sequence is to be executed.
Example of How to Use a State Machine
To exemplify how to use a state machine, we are going to build the guessing game we did in the previous chapter, the only difference being that we will try to guess a number between 1 and 100.
- Create a blank process and, on the Design tab, in the File group, select New > State Machine. The New State Machine window is displayed.
Note:
You can also add a State Machine activity to the Designer panel to create a new state machine automation.
- In the Name field type a name for the automation, such as “First State Machine”, and leave the default project location or add a subfolder. Click Create. The Designer panel is updated accordingly.
- Create two integer variables,
InitialGuessandRandomNumber. The first variable stores your guess, while the second stores the random number. - Add a State activity to the Designer panel and connect it to the Start node. This is the initial state, and it is used to generate a random number.
- Double-click the activity. This State activity is displayed expanded in the Designer panel.
- In the Properties panel, in the DisplayName field, type Initializing Random Number. This enables you to easily tell states apart.
- In the Entry section, add an Assign activity.
- In the To field, add the
RandomNumbervariable. - In the Value field, type
new Random().Next(1,100). This expression generates a random number. - Return to the main project view and add a new State activity.
- Connect it to the previously added activity.
- Double-click the last added State activity. This activity is displayed expanded in the Designer panel.
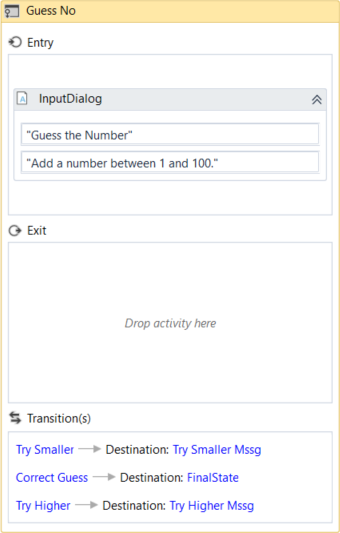
- In the Properties panel, in the DisplayName field, type Guess Number. This state is used to prompt the user to guess a number.
- In the Entry section, add an Input Dialog activity.
- Select the Input Dialog, and in the Properties panel, add an appropriate Label and Titleto prompt the user to guess a number between 1 and 100.
- In the Result field, add the
InitialGuessvariable. This variable stores the user’s guess. - Return to the main project view and create a transition that points from the Guess Number state to itself.
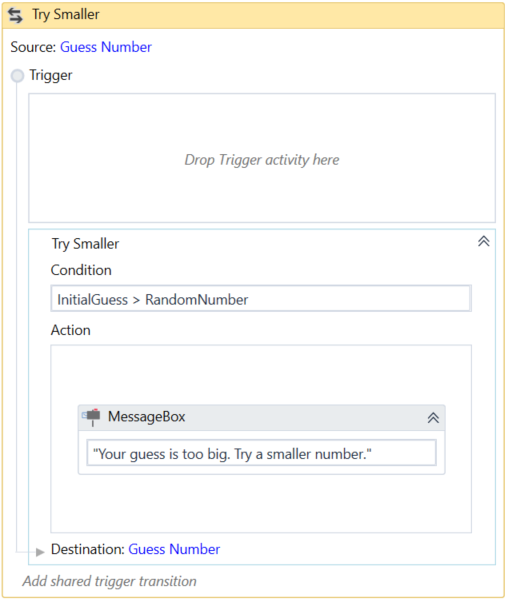
- Double-click the transition. The transition is displayed expanded in the Designer panel.
- In the Properties panel, in the DisplayName field, type Try Smaller. This message is displayed on the arrow, enabling you to run through your automation easier.
- In the Condition section, type
InitialGuess>RandomNumber. This verifies if the user’s guess is bigger than the random number. - In the Action section, add a Message Box activity.
- In the Text field, type something similar to “Your guess is too big. Try a smaller number.” This message is displayed when the user’s guess is bigger than the random number.
- Return to the main project view and create a new transition that points from the Guess Number state to itself.
- Double-click the transition. The transition is displayed expanded in the Designer panel.
- In the Properties panel, in the DisplayName field, type “Try Bigger”. This message is displayed on the arrow, enabling you to run through your automation easier.
- In the Condition section, type
InitialGuess<RandomNumber. This verifies if the guess is smaller than the random number. - In the Action section, add a Message Box activity.
- In the Text field, type something similar to “Your guess is too small. Try a bigger number.” This message is displayed when the users guess is smaller than the random number.
- Return to main project view and add a Final State activity to the Designer panel.
- Connect a transition from the Guess Number activity to the Final State.
- In the Properties panel, in the DisplayName field, type “Correct Guess”.
- In the Condition field, type
InitialGuess=RandomNumber. This is the condition on which this automation steps to the final state and end. - Double-click the Final State activity. It is displayed expanded in the Designer panel.
- In the Entry section, add a Message Box activity.
- In the Text field, type something similar to “Congratulations. You guessed correctly! The number was ” +
RandomNumber.ToString+ “.” This is the final message that is to be displayed, when the user correctly guesses the number.
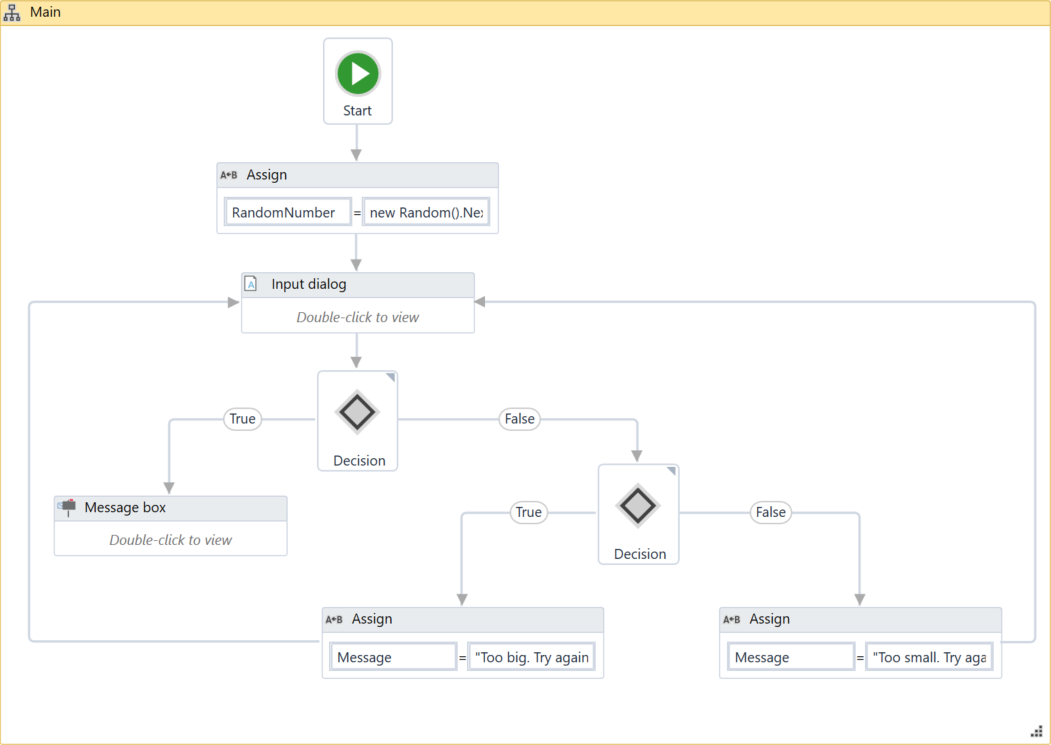
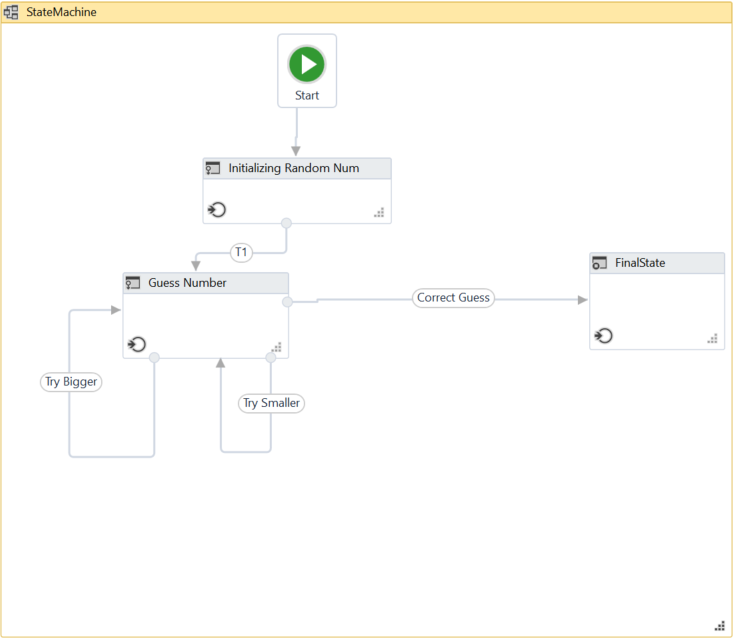
The final project should look as in the following screenshot.
- Press F5. The automation is executed correctly.